
As an Amazon Associate I earn from qualifying purchases and sometimes recommend products from other sellers at no extra cost you. For more details see my disclosure policy and privacy policy.
There’s a moment every backyard griller knows well you’re standing over the grill, spatula in hand, wondering if the burger is done. Too soon and it’s pink in the middle; too long and you’ve got a hockey puck. Getting burger timing right isn’t just about confidence it’s the difference between a juicy, crowd-pleasing cookout and an apology to your guests.
This guide covers everything you need to know about grilling burgers to every doneness level, from medium-rare to well-done. Whether you’re cooking on gas or charcoal, we’ll walk through the times, temperatures, and technique that make it all click plus why a good instant-read thermometer is the one tool you shouldn’t grill without.
Why Time Alone Won’t Cut It
Here’s something most grilling guides won’t tell you upfront: cook times are a guideline, not a guarantee. A ¾-inch patty on a gas grill running at 425°F behaves very differently to a 1-inch patty on a charcoal grill that’s running a little cool. Thickness, starting temperature of the meat, grill heat, and even windchill all affect how quickly a burger reaches its target temperature.
The only way to know for certain is to measure internal temperature with an instant-read thermometer. Relying on color alone is genuinely unreliable burgers can brown on the outside before reaching a safe internal temperature, and some can stay pink even when fully cooked due to the meat’s pH. Time gives you a ballpark; temperature gives you the answer.
Burger Doneness Temperatures: The Full Chart
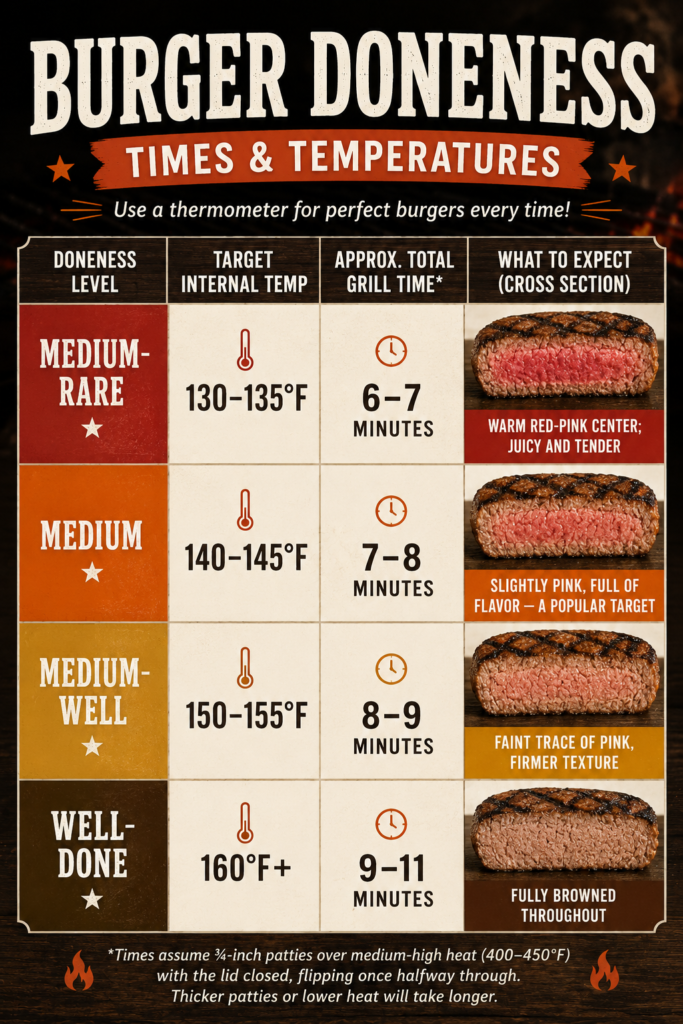
For beef burgers, most grillers work to these standard doneness targets:
| Doneness | Target Internal Temp | Approx. Total Grill Time* | What to Expect |
|---|---|---|---|
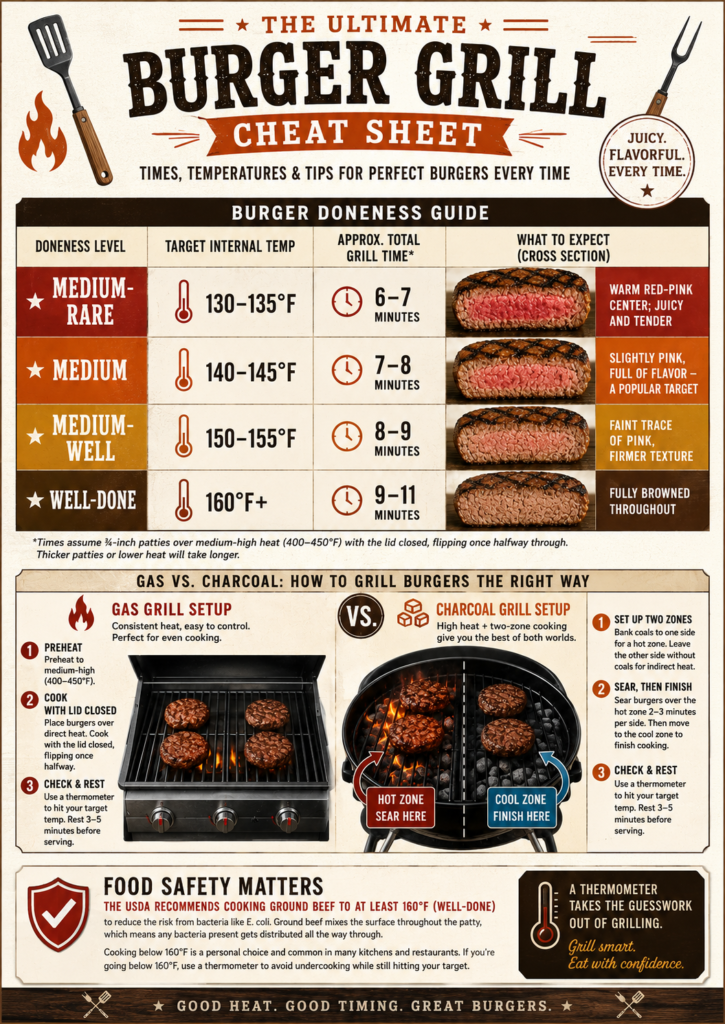
| Medium-rare | 130–135°F | 6–7 minutes | Warm red-pink center; juicy and tender |
| Medium | 140–145°F | 7–8 minutes | Slightly pink, full of flavor a popular target |
| Medium-well | 150–155°F | 8–9 minutes | Faint trace of pink, firmer texture |
| Well-done | 160°F+ | 9–11 minutes | Fully browned throughout |
Times assume ¾-inch patties over medium-high heat (400–450°F) with the lid closed, flipping once halfway through. Thicker patties or lower heat will take longer.
A Note on Food Safety
The USDA recommends cooking ground beef to at least 160°F (well-done) to reduce the risk from bacteria like E. coli. Unlike whole cuts of beef where the exterior cooks quickly and the interior stays protected ground beef mixes the surface throughout the patty, which means any bacteria present gets distributed all the way through.
Cooking below 160°F is common in restaurant kitchens and home cookouts, and many people do it regularly. That’s a personal choice, but it’s worth knowing the risk, especially when cooking for children, elderly guests, or anyone immunocompromised. If you’re going below 160°F, a thermometer isn’t optional it’s how you avoid undercooking while still hitting your target.
Gas vs. Charcoal: What Actually Changes
The good news is that the target temperatures above apply to both gas and charcoal grilling. The doneness you’re aiming for doesn’t change; what changes is how quickly and how evenly you get there.
Grilling Burgers on Gas
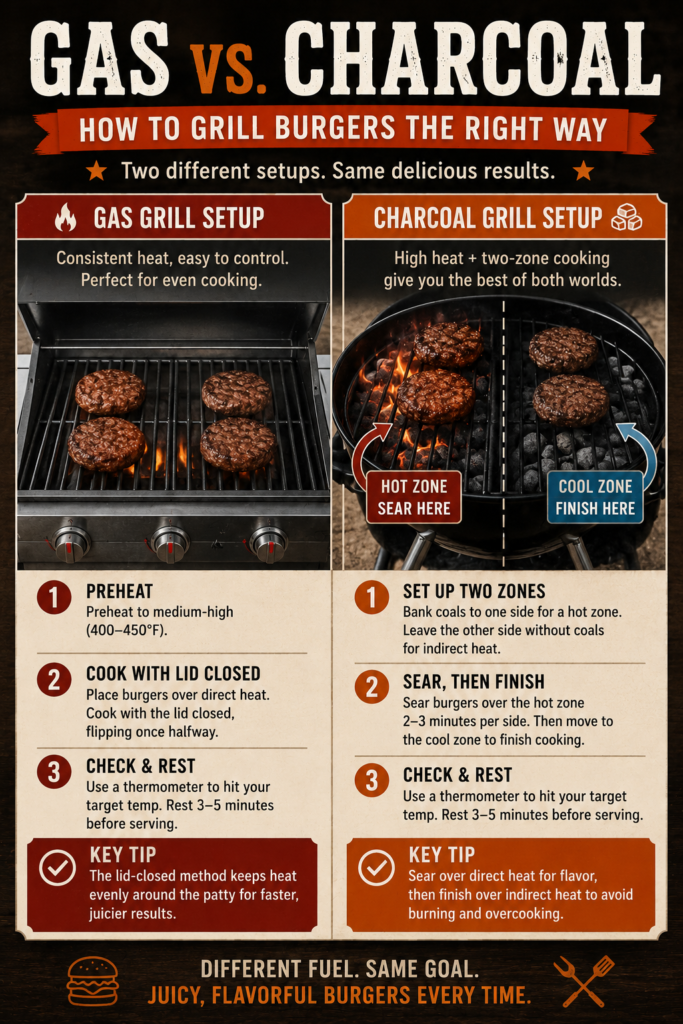
Gas grills are consistent and easy to control, which makes them well-suited to burger timing. Preheat to medium-high heat (around 400–450°F), oil the grates lightly to prevent sticking, and place your patties down with the lid closed. Cook using the times in the chart above as your starting point, flipping once halfway through, and use a thermometer to check the internal temperature before pulling them off.
The lid-closed approach is key on gas it keeps the heat surrounding the patty from all sides and shortens cook time, which helps the center cook through before the outside overcooks.
Grilling Burgers on Charcoal
Charcoal typically burns hotter than gas and delivers a stronger sear, which can shave a minute or two off your total cook time when cooking directly over the coals. The two-zone setup is your best friend here: build a hot zone with coals on one side and leave the other side coal-free.
Sear your burgers 2–3 minutes per side over the hot zone to get that caramelized crust, then slide them to the indirect side to finish to your target internal temperature without burning the outside. This is especially useful for thicker patties or when you’re cooking well-done you get the char without turning the exterior to ash.
Why Resting Your Burgers Matters
This step gets skipped more often than it should. When you pull a burger off the grill, it’s still carrying heat, and that heat continues to raise the internal temperature for a minute or two after it leaves the grill this is called carryover cooking. For burgers, that typically means a rise of 3–5°F.
Resting also gives the juices time to redistribute through the patty rather than spilling out the moment you bite in. A 3–5 minute rest on a warm plate or under a loose tent of foil makes a real difference to how moist the burger eats. If you’re targeting medium (140–145°F), try pulling your burgers at 138–140°F and letting carryover and resting do the rest.
The Tool That Makes Everything Easier
If there’s one upgrade that immediately improves your burger game, it’s a quality instant-read thermometer. Guessing by touch, color, or timer is hit-or-miss; checking the temperature takes three seconds and removes all the uncertainty.
Two options worth looking at for home grillers:
- ThermoWorks ThermoPop 2 Fast, accurate, and splash-proof, this is the reliable budget-friendly pick that many home cooks reach for. The angled display makes it easy to read without holding the grill lid open longer than you need to. [Add affiliate link]
- Lavatools Javelin Pro Duo A step up in features with a rotating backlit display and a strong magnet for storage on the grill or fridge. A good option if you grill regularly and want something slightly more premium without spending a lot. [Add affiliate link]
Either of these will pay for itself in better burgers.
Gas vs. Charcoal Quick Reference
For easy reference, here’s how the approach breaks down side by side:
- Gas: Preheat to 400–450°F, oil the grates, grill with lid closed, flip once halfway, check temp before pulling
- Charcoal: Use a two-zone setup, sear 2–3 minutes per side over direct heat, finish on the indirect side to target temp
The times in the chart above work as a starting point for both. The thermometer tells you when you’re actually done.
Common Burger Grilling Mistakes to Avoid
Even with the right temperatures in hand, a few habits can work against you:
- Pressing the patty with the spatula. This squeezes out the juices and leads to dry, dense burgers. Leave them alone once they’re on the grill.
- Flipping too often. A single flip halfway through is all you need. Constant flipping prevents a proper crust from forming.
- Skipping the preheat. A cold grill leads to uneven cooking and patties that stick. Give it 10–15 minutes to reach temperature before adding the burgers.
- Not making a thumbprint indent. Burgers puff up in the middle as they cook due to the proteins tightening. Pressing a shallow indent in the center of each raw patty helps them cook flat and even.
- Skipping the rest. Even 3 minutes makes a difference. Slice too early and you’ll lose half the juice to the plate.
Putting It All Together
Grilling the perfect burger comes down to three things: knowing your target temperature, choosing the right method for your grill type, and having a thermometer on hand to confirm when you’ve hit it. The times in the chart above give you a practical starting point, but they’re always secondary to what the thermometer tells you.
If you’re cooking for a crowd with mixed preferences, start the well-done patties first and work backwards pull medium-well at 150–155°F, medium at 140–145°F, and medium-rare last at 130–135°F. That way everything comes off the grill in roughly the right order and rests together before serving. For more on keeping everything hot and juicy while you cook in batches, how to keep burgers warm and moist after grilling is worth a read before your next cookout.
The fundamentals are simple once you have the numbers down. Preheat the grill, season well, flip once, check the temp, rest briefly, and serve. Everything else is just detail.
Continue Your Journey
- How to Grill the Best Burgers: Tips & Recipes the full technique guide to accompany these times and temperatures
- Grilled Burgers with Blue Cheese and Avocado a great recipe to put these skills to use
- How to keep burgers warm and moist after grilling essential reading for anyone cooking burgers in batches
- Summer BBQ Food Safety Tips: 7 Essentials for Grilling Outdoors a deeper look at safe grilling temperatures and practices
- The 6 Best Meats for Grilling and Barbecuing This Summer what to throw on the grill beyond burgers
What doneness level do you usually go for, and do you cook by time or temperature? Drop a comment below always curious how other people approach it.
Want more BBQ tips, recipes, and grilling guides delivered straight to your inbox? Sign up for the Patio Feasts newsletter and never miss a post.


