As an Amazon Associate I earn from qualifying purchases and sometimes recommend products from other sellers at no extra cost you. For more details see my disclosure policy and privacy policy.
There’s a specific kind of pressure that comes with cooking burgers for a crowd. Everyone’s hungry, the grill is going, and you’re staring at a row of patties trying to decide whether they’re done. You don’t always have a thermometer nearby, or maybe you’re just curious whether you can eyeball it.
The honest answer is yes, you can get pretty close using touch and visual cues alone. But this post is going to be upfront with you: these methods are educated guesses, not guarantees. Once you’ve read through them, you’ll understand exactly what to look for, when they work well, and when you should still reach for a thermometer.
Why You Can’t Always Trust What You See
The first instinct most people have is to look at the colour of the burger. If it looks brown and cooked through, it must be done, right? Not always. Colour is one of the least reliable indicators of burger doneness, and that’s worth understanding before anything else.
Burgers can turn brown on the outside long before the centre reaches a safe temperature, especially if you’re cooking over high heat. On the flip side, some patties can stay slightly pink inside even when they’re fully cooked, depending on the meat blend and fat content. So while colour plays a supporting role, it shouldn’t be the only thing you’re watching.
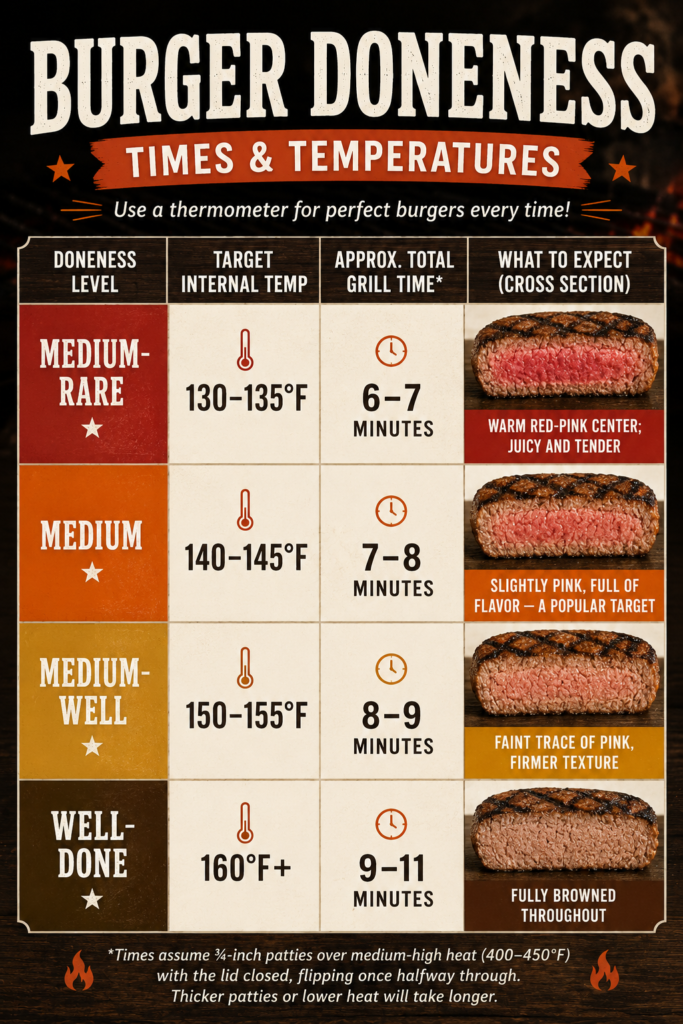
The USDA recommends cooking ground beef burgers to an internal temperature of 160°F to eliminate harmful bacteria. That’s the well-done range. For medium, most cooks aim for around 140 to 145°F, while pulling patties off at about 155°F and letting carry-over cooking do the rest is a useful trick for getting close to safe without drying everything out.
What About Cooking Time?
Time is another loose guide that people lean on, but it has the same problem as colour: it doesn’t account for patty thickness or grill temperature. A standard patty over medium heat might take around 4 to 5 minutes per side for medium, or 6 to 7 minutes per side for well-done, but those numbers shift considerably depending on your setup. Think of time as a rough starting point, not a finishing line.
The Touch Test: Your Most Useful Tool
The most reliable no-thermometer technique is the touch test. It takes a little practice to calibrate, but once you get the feel for it, it becomes genuinely useful.
The classic version uses your own hand as a reference point. Press the fleshy pad at the base of your thumb while your hand is relaxed and your fingers are open. That soft, squishy feel is what raw meat feels like. Now touch your thumb to your index finger and press the same pad again. It firms up slightly, which is closer to rare. Moving through to your middle finger gives you medium-rare, your ring finger gets you to medium or medium-well, and touching your pinky gives a very firm feel that corresponds to well-done.
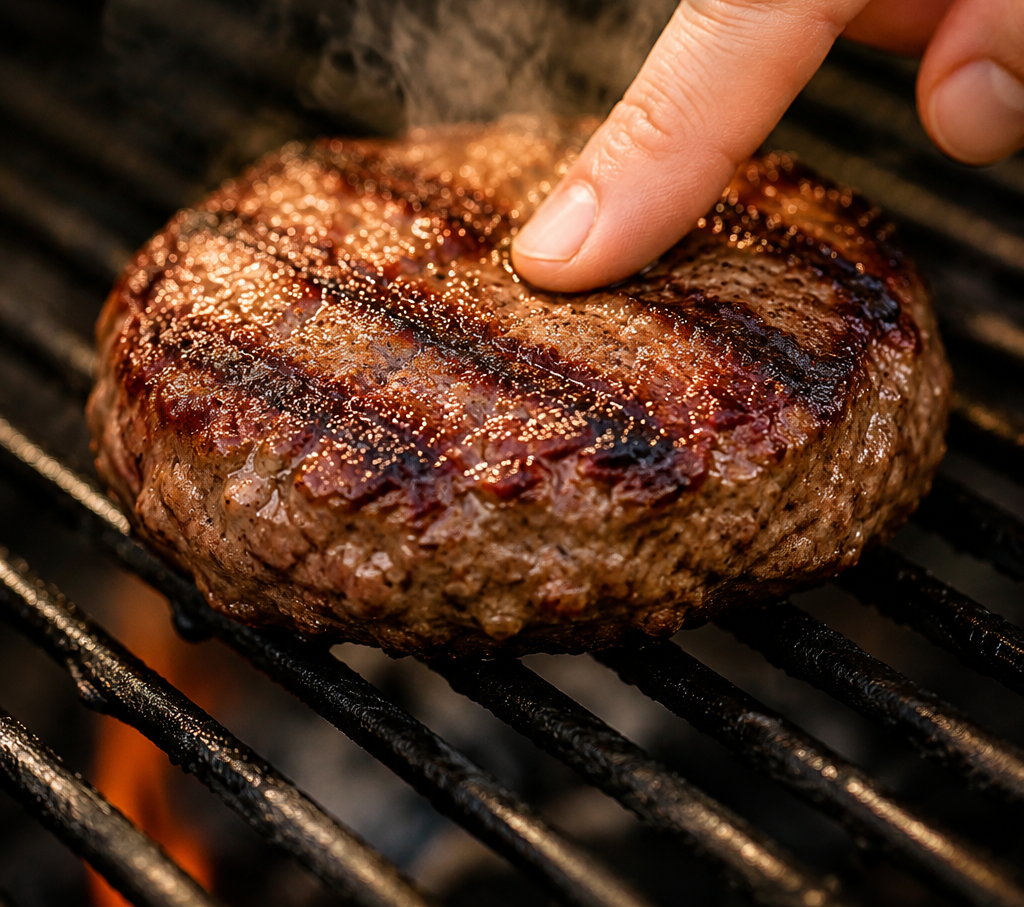
To use this on your burgers, press the centre of a patty gently with a clean finger and compare the resistance to how the pad of your thumb feels in each hand position. The logic is simple: burgers firm up as they cook, so the more resistance you feel, the further along they are.
Pressing the Sides, Not Just the Top
Here’s a refinement that doesn’t get talked about enough. The top surface of a burger can feel deceptively soft even when the patty is well on its way to being cooked, because the exterior crust can mask what’s happening inside. Try squeezing the sides of the patty gently instead.
As the burger cooks through, the sides firm up more noticeably. If the sides have a little give and bounce back when you release pressure, you’re likely around medium-rare to medium. If the sides feel quite firm with almost no movement, you’re heading into medium-well or well-done territory. Combining this side squeeze with the hand test gives you two data points instead of one, which makes your read more reliable.
Reading the Juices
Once you’ve got the touch test working for you, visual cues around the juices can add another layer of confidence. These aren’t perfect either, but they’re useful alongside everything else.
When you press or poke the top of a patty gently, you’ll sometimes see a little juice escape. The colour of that juice tells a rough story: red juice suggests the burger is still quite underdone, pink juice points to medium territory, and clear juice is a sign you’re approaching well-done. Cutting into the centre and seeing the same thing is even more informative, though it does let out moisture you’d probably rather keep inside the patty.
The edges of the burger also give useful visual information. Once the sides have browned all the way up and there’s visible colour change around the full perimeter, you’re likely past rare. Combine that with the squeeze test and you’ve got a reasonably solid read without needing any equipment.
The Limits of Visual Cues
It’s worth saying again: visuals can mislead you. Juices don’t always behave predictably, especially with different fat percentages or additives in the meat. A 20% fat patty behaves differently from a leaner blend. If you’re cooking for people who are pregnant, immunocompromised, elderly, or you’re serving kids, the visual and touch methods are not enough on their own. A best meat thermometer for grilling is the only way to be certain.
Putting It Together: A Practical Approach at the Grill
Knowing the individual techniques is one thing. Being able to use them together quickly and confidently while you’re managing a hot grill is the real goal. Here’s how to bring it all together in practice.
Start by pressing the centre of each patty after the first flip. Get a baseline feel for the resistance and compare it to your hand. At the same time, look at the edges. Are they browning fully around the sides? Give the sides a gentle squeeze and check for bounce-back. If everything points to medium and you’re happy with that, you’re done.
One more useful tip: let your burgers rest for a couple of minutes after coming off the grill. Carry-over cooking means the internal temperature continues to rise even off the heat, often by 5 to 10 degrees. If you’re targeting around 155°F but don’t have a thermometer, pulling burgers when they feel firm but still have a tiny bit of give, then resting them briefly, gives you a reasonable shot at landing near the 160°F mark.
Pairing This With Your Broader Burger Game
These techniques are most useful when your burgers are already seasoned well and going on at the right thickness. A patty that’s too thin will cook unevenly and be harder to read by touch. If you haven’t already looked at how to season burgers for grilling, that’s a good companion read because the seasoning blend you use can actually affect how the patty behaves on the grill. And for anyone who wants to understand the timing side more deeply, how long to grill burgers covers times and temperatures for every doneness level in detail.
When You Should Still Use a Thermometer
Everything covered in this post will help you make a more informed call without a thermometer. But there are situations where you really should have one on hand regardless.
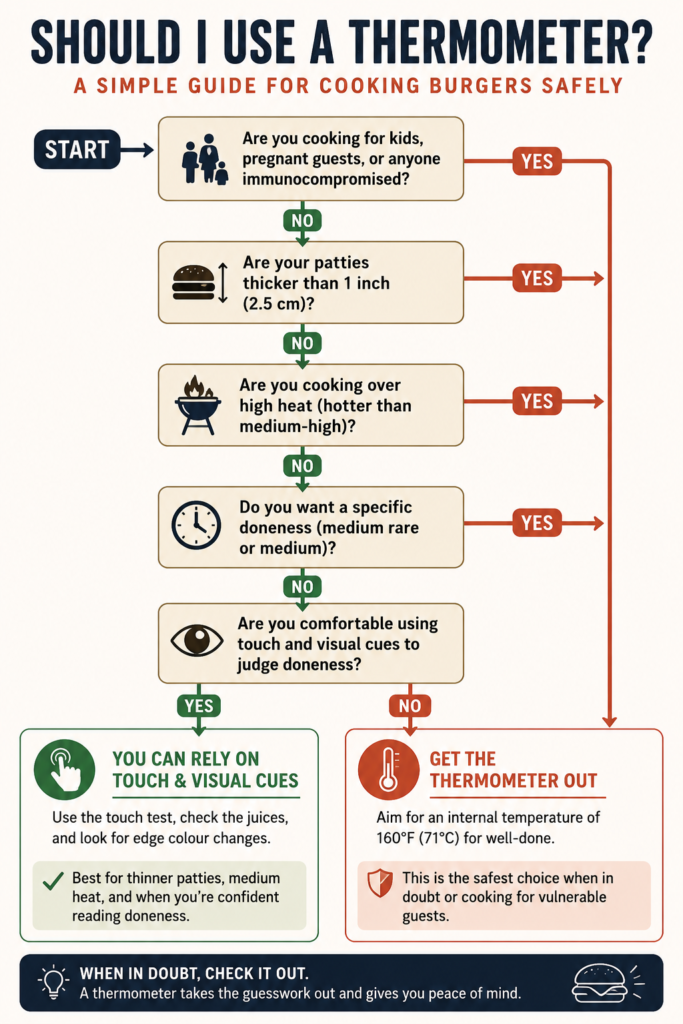
If you’re cooking for people in higher-risk groups, a thermometer is non-negotiable. If your patties are very thick, the touch test becomes less reliable because there’s more mass to read through. If you’re cooking in low light or in conditions where it’s hard to see the visual cues clearly, you’re working with less information than you think. And if you’re newer to grilling and haven’t yet developed a feel for the touch test, you’re essentially guessing until you’ve built up enough experience to calibrate.
A good instant-read thermometer takes the uncertainty out completely. Insert the probe into the side of the patty rather than straight down from the top to get an accurate reading while keeping the burger as intact as possible. If you’re looking for recommendations, the best meat thermometer for grilling post covers the top options at different price points, including some that read in just a couple of seconds.
The Bottom Line on Reading Burgers Without a Thermometer
The touch test is the most useful no-equipment method, and learning to combine it with the side squeeze and juice colour gives you a much better picture than relying on any single cue alone. With practice, you’ll start to develop a feel for it that becomes almost automatic at the grill.
That said, be honest with yourself about the limits. These techniques are reliable enough for everyday backyard grilling when you know your grill and your patties. They’re not substitutes for a thermometer when the stakes are higher. Keep one nearby, use the touch test to get close, and verify with the thermometer when it matters. That’s the approach that keeps food tasting great and everyone at the table safe.
Keep Reading
How to Grill the Best Burgers: Tips & Recipes — Everything you need to know about technique, from shaping the patty to getting the perfect sear.
How Long to Grill Burgers: Times & Temperatures for Every Doneness Level — A full breakdown of grilling times matched to doneness levels, great to read alongside this post.
How to Season Burgers for Grilling: Simple Blends That Actually Work — The seasoning side of getting a great burger, with blends that work whether you like things simple or bold.
Best Meat Thermometer for Grilling: Our Top Picks for Perfectly Cooked BBQ — When you want to take the guesswork out entirely, this is where to start.
How to Keep Burgers Warm and Moist After Grilling — Got the cooking sorted? Here’s how to hold your burgers at their best until everyone’s ready to eat.
Got a trick you swear by for checking burger doneness without a thermometer? Drop it in the comments below.
Want practical BBQ tips, grilling guides, and seasonal recipes sent straight to your inbox? Sign up to the Patio Feasts newsletter.