As an Amazon Associate I earn from qualifying purchases and sometimes recommend products from other sellers at no extra cost you. For more details see my disclosure policy and privacy policy.
Ribs have a reputation for being intimidating, and honestly, a lot of that reputation is undeserved. People picture hours of fussing over a smoker, constant temperature checks, and a real risk of ending up with something dry, tough, or undercooked.
The truth is that ribs are one of the most forgiving cuts you can put on a grill once you understand the basic logic behind cooking them. This guide walks you through a simple, beginner-proof method using baby back ribs, the classic 3-2-1 approach, and the fixes for every fear that might be holding you back from trying it.
Why Baby Back Ribs Are the Right Starting Point
If you’re new to ribs, start with baby backs rather than spare ribs. They’re smaller, leaner, and cook faster, which makes them far easier to manage on a standard backyard grill or kettle.
Their curved shape and higher meat-to-bone ratio also make doneness easier to judge. You can see the meat pull back from the bone ends and feel the bend test respond more clearly than you can on a flatter, larger rack.
Baby backs are forgiving on texture, too. Even if you run a little long on time, they tend to stay tender rather than turning stringy and tough the way an overcooked spare rib can. Think of them as the training wheels of the rib world: once you’ve nailed a rack of baby backs, moving on to spare ribs or beef ribs becomes a much smaller leap.
What You’ll Need Before You Start
You don’t need specialty equipment to pull this off. A grill capable of holding a steady low temperature, some heavy-duty foil, and a few pantry staples for your rub are enough to get you started.
Here’s the short list:
- A grill set up for indirect heat: charcoal grill, gas grill, or smoker, all work
- A reliable thermometer: an instant-read or leave-in probe takes the guesswork out of doneness
- Heavy-duty aluminum foil: for the wrapped phase of cooking
- A butter knife and paper towel: for removing the membrane
- Basic rub ingredients: salt, brown sugar, paprika, black pepper, and optional garlic or onion powder
If your thermometer situation is more “meat-flipper guesswork” than actual tool, it’s worth fixing before rib day. Our guide to the best meat thermometer for grilling breaks down which style suits a beginner cook best, and a good pair of tongs makes handling a hot, heavy rack of ribs a lot less stressful. Check out our guide to choosing the best grilling tongs if yours have seen better days.
Prepping Your Ribs the Right Way
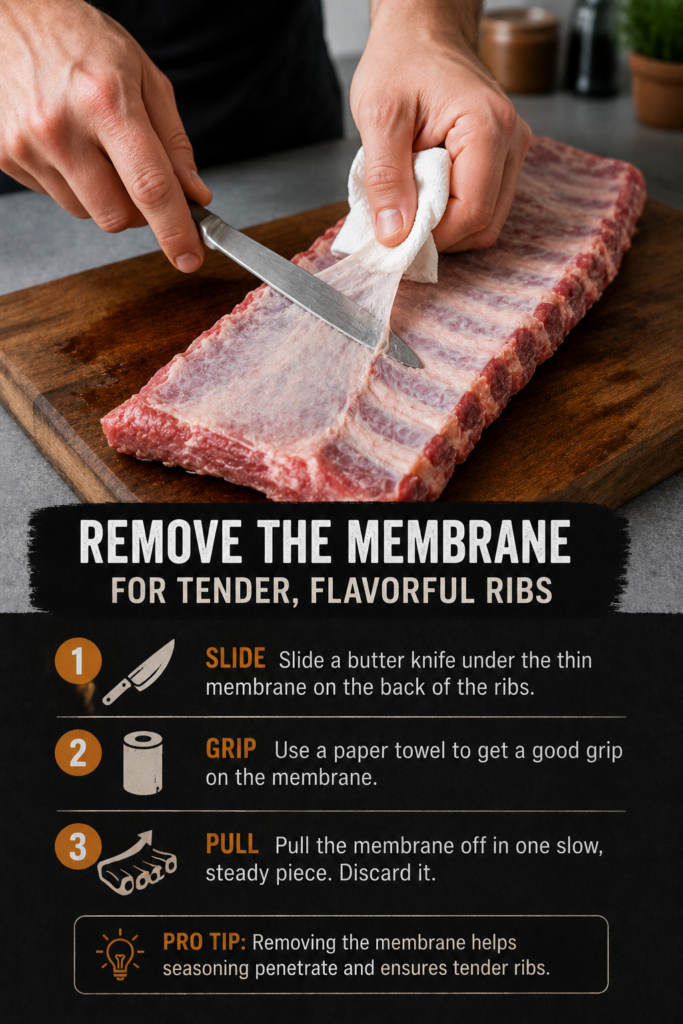
Good prep makes the rest of the process almost foolproof. Start by removing the membrane on the bone side of the rack, since leaving it on blocks seasoning and smoke from penetrating and creates a chewy layer that nobody enjoys biting into.
Slide a butter knife under the membrane at one end of the rack to loosen an edge, then grip it with a paper towel and pull it off in one motion. It should come away in a single piece if you’ve got a good grip.
Once the membrane is off, pat the ribs dry and apply your rub generously on both sides. A simple beginner rub built on roughly equal parts salt, brown sugar, and paprika, with black pepper and a touch of garlic or onion powder, is plenty. The goal at this stage is to let the method and the smoke do the heavy lifting rather than overcomplicating things with a long ingredient list.
The 3-2-1 Method, Step by Step
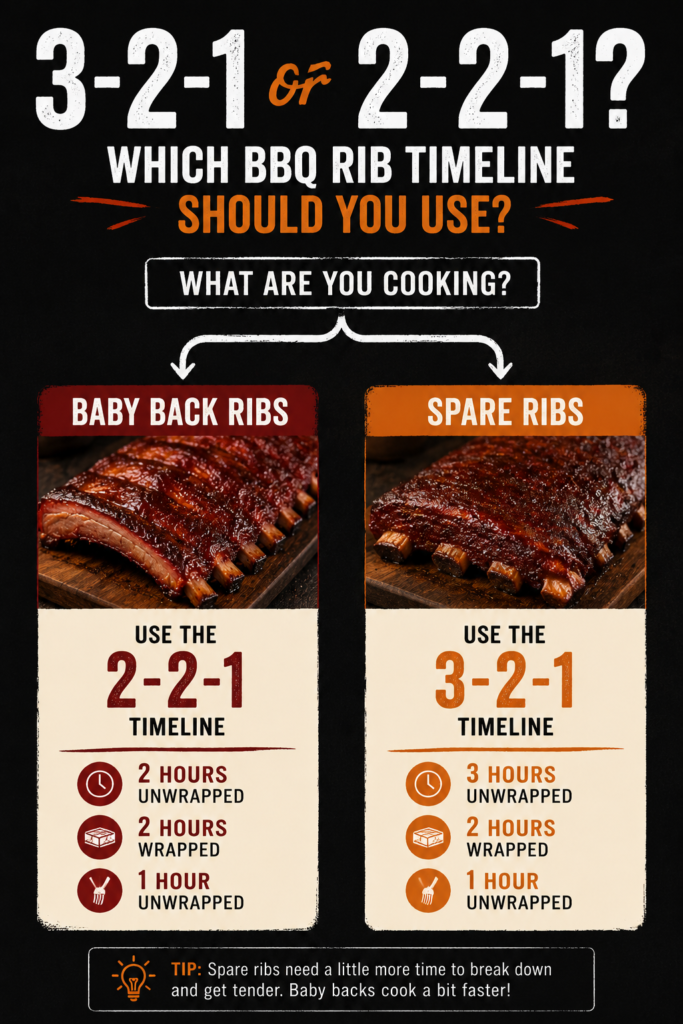
The 3-2-1 method is less a rigid recipe and more a time structure that takes the guesswork out of cooking ribs low and slow. It breaks the cook into three distinct phases, each with its own job to do.
Step 1: Three Hours Naked
Set your grill up for indirect heat, meaning coals banked to one side of a charcoal grill or the outer burners lit on a gas grill, and aim for a steady 225 to 250°F. Place the seasoned ribs on the cool side, unwrapped, and let them cook for about three hours.
This phase is where the ribs pick up color and smoke flavor. Resist the urge to lift the lid constantly. Every peek lets heat escape and adds time to your cook.
Step 2: Two Hours Wrapped
After three hours, wrap the ribs tightly in foil with a splash of apple juice or water added before sealing. Return them to the grill at the same temperature for about two hours.
This phase braises the meat inside its foil packet, locking in moisture and pushing the ribs toward tenderness. It’s the step beginners are most tempted to skip, and it’s also the one that prevents dry ribs more than any other.
Step 3: One Hour to Finish
Unwrap the ribs and put them back on the grill, uncovered, for up to an hour. This is where the bark firms back up and any sauce you add gets a chance to set rather than just sitting wet on the surface.
Start checking for doneness around the thirty-minute mark using the bend test and a thermometer reading. For baby backs specifically, many pitmasters recommend trimming this whole process down closer to a 2-2-1 split, since the smaller rack cooks faster and can turn mushy if you push the full 3-2-1 timeline. Treat 3-2-1 as your training wheels and start adjusting downward as you get a feel for how your ribs are behaving.
How to Know When Your Ribs Are Actually Done
This is where most beginner anxiety lives, so let’s address the fears directly.
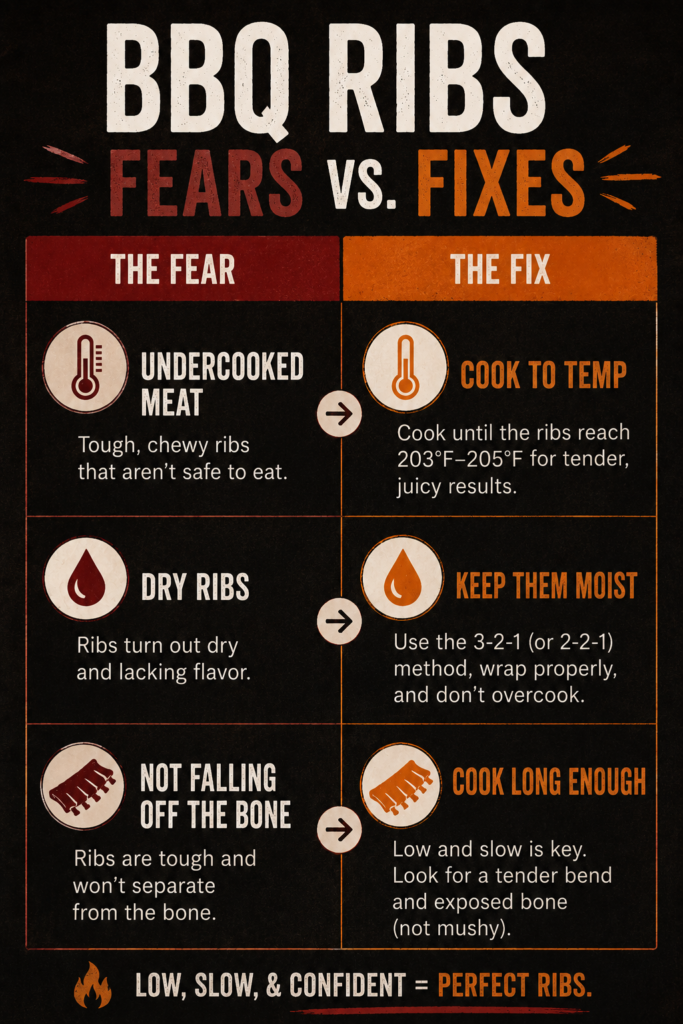
- Fear: undercooked pork will make people sick. Fix: rely on both temperature and visual checks together rather than guessing. Aim for an internal temperature in the 195 to 205°F range, measured between the bones, and back it up with the bend test, where the rack flexes and the surface cracks slightly when you lift one end with tongs.
- Fear: the ribs always turn out dry. Fix: stick with low and slow indirect heat, and don’t skip the wrapped phase, since that’s what traps moisture during the cook. Keeping the lid closed as much as possible also helps the grill hold a steady temperature instead of swinging up and down every time you check on things.
- Fear: if the meat doesn’t fall off the bone, something went wrong. Fix: that’s actually a sign of overcooking, not success. Competition-style ribs are meant to offer a gentle tug, with the meat pulling cleanly away and leaving a neat bite mark, rather than sliding off the bone in one motion.
If you want a second layer of reassurance on the food safety side, our Summer BBQ food safety tips post covers safe handling and temperature guidance for outdoor cooking more broadly.
Common Beginner Mistakes (And How to Avoid Them)
A few small habits separate a frustrating first attempt from a smooth one. Most of these come down to patience rather than skill.
- Chasing an exact temperature number. Accept a range, like 225 to 265°F, instead of obsessing over hitting one precise figure. Grills drift naturally, and small fluctuations won’t ruin your ribs.
- Lifting the lid too often. Every check costs you heat and adds cook time. Trust the process and use a thermometer probe if you want to monitor without opening the grill.
- Saucing too early. Add sauce only in the final twenty to thirty minutes of cooking so the sugars don’t burn and the sauce has time to set into the bark rather than just sitting on top.
- Starting too late in the day. A full 3-2-1 cook runs around six hours. If you’re aiming to eat at six in the evening, plan to have the grill lit by noon. Ribs reward people who start early far more than people who rush.
What to Serve With Your Ribs
Ribs are rich and a little messy, which means they pair best with sides that bring some lightness and crunch to the table. A platter of grilled corn on the cob with herbed parmesan butter is an easy crowd-pleaser that cooks on the same grill while your ribs rest.
If you’re planning a full spread rather than just ribs on their own, our guide to BBQ portion planning is worth a look so you know roughly how much to make per guest. And if this cook is part of a bigger holiday gathering, our Fourth of July BBQ menu guide walks through building out a full menu around a centerpiece like ribs.
Storing and Reheating Leftover Ribs
Leftover ribs hold up well if you store them properly. Wrap them tightly in foil or place them in an airtight container, then refrigerate for up to four days.
To reheat without drying them out, wrap the ribs in foil with a small splash of water or apple juice and warm them in a 250°F oven until heated through, usually around twenty to thirty minutes. Avoid the microwave if you can, since it tends to toughen the meat rather than gently bringing it back to temperature.
Leftover rib meat also makes a great base for other dishes if you want to stretch a single rack further. Pulled rib meat works beautifully in tacos, sandwiches, or alongside something like our pulled BBQ pork sliders for a smaller, shareable version of the same flavors.
Frequently Asked Questions
Do I need a smoker to make good ribs? No. A charcoal grill, gas grill, or kettle grill set up for indirect heat works just as well as a dedicated smoker, especially for a beginner-friendly 3-2-1 cook.
Why are my ribs tough even after several hours? Tough ribs are usually a sign of either too high a cooking temperature or skipping the wrapped phase, both of which prevent the connective tissue from breaking down properly. Slow it down and make sure the wrap phase is included.
Can I use this method on spare ribs instead of baby backs? Yes, though spare ribs are larger and tougher, so they typically need closer to the full 3-2-1 timeline rather than the shortened 2-2-1 version recommended for baby backs.
What’s the difference between baby back and spare ribs? Baby back ribs come from higher on the rib cage near the spine, are smaller and leaner, and cook faster. Spare ribs come from lower down, are larger and fattier, and take longer to become tender.
Should I trim anything besides the membrane? Most racks need just the membrane removed and any obviously loose flap meat trimmed for an even cook. Beyond that, minimal trimming keeps more flavor and moisture in the meat.
Once you’ve worked through your first rack using this method, the whole process stops feeling like a gamble and starts feeling like a routine you can repeat with small tweaks each time. Start with baby backs, trust the three phases, and judge doneness by feel and temperature rather than the clock alone.
What’s stopped you from trying ribs at home before now? Drop a comment and let us know, and if this guide helped, the Fourth of July BBQ menu is a great next stop for planning a full spread around them.
Want more grilling guides and BBQ tips like this delivered straight to your inbox? Sign up for the Patio Feasts newsletter and never miss a post.